Pixi#
What is Pixi?#
Pixi is a modern package management tool that makes it easy to install and manage software dependencies for your projects. Think of it as a smart assistant that:
Installs packages - Downloads and sets up the software you need
Manages environments - Keeps different projects separate so they don’t conflict
Handles dependencies - Automatically figures out what other software is needed
Works cross-platform - Runs the same way on Windows, Mac, and Linux
Why Use Pixi?#
If you’ve ever struggled with “it works on my computer but not yours” problems, Pixi helps solve that. It creates reproducible environments where everyone working on a project gets exactly the same software versions.
Key Benefits#
Fast - Downloads and installs packages quickly
Reliable - Ensures everyone gets the same setup
Simple - Easy commands to get started
Compatible - Works with existing Python, R, and other ecosystems
This section will be expanded with installation instructions and examples in the following parts of the course.
MORE PIXI TO COME LATER!
Creating Environments#
Just Create the Environment (Don’t Run Tasks)#
If you want to create the pixi environment without running any tasks:
pixi install
This command:
Reads your
pixi.tomlfileCreates the environment
Installs all dependencies
Does NOT run any tasks
Create Environment AND Run a Task#
If you want to both create the environment and run a specific task:
pixi run startup
This command:
Creates the environment (if it doesn’t exist)
Installs dependencies
Also runs the “startup” task
Tip: Use pixi install when you just want to set up the environment for the first time or update dependencies without running anything.
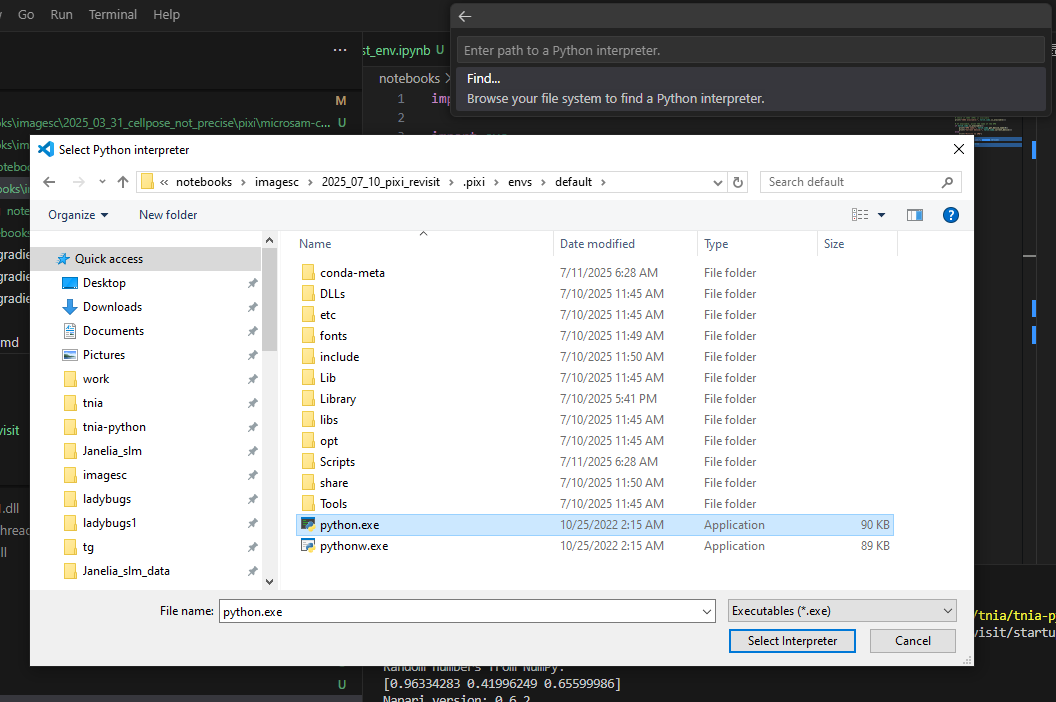
Load environment in VSCode#
To run a script with a pixi created environment
[ctrl][shift][p] to open command pallette
‘Python: Select Interpreter’
‘Enter Interpreter Path’
‘Browse your file system’
Then (see below screenshot) select Python interpreter
Make Pixi Environment Available to VS Code Notebooks#
There are two ways to use your pixi environment with VS Code notebooks:
Option 1: Register as Jupyter Kernel (Recommended)#
This makes your environment appear in the kernel selector dropdown:
pixi run python -m ipykernel install --user --name=appose_napari_ai --display-name "Python (appose_napari_ai)"
If this fails with “No module named ipykernel”:
First add ipykernel to your project:
pixi add ipykernelThen run the command above
Option 2: Select Python Interpreter Directly#
In any notebook:
Click the kernel selector (top right of notebook)
Choose “Select Another Kernel”
Choose “Python Environments”
Browse to your pixi environment’s Python executable
Pixi environment location: Usually in .pixi/envs/default/bin/python (Linux/Mac) or .pixi/envs/default/python.exe (Windows)
Troubleshooting#
“No module ipykernel”: Add it with
pixi add ipykernelfirstCan’t find environment: Use
pixi infoto see environment pathKernel not showing up: Restart VS Code after registering kernel