Run multiple frameworks with Appose#
Call multiple deep learning frameworks (cellpose cyto3, cellposesam, microsam, and mobilesam) in the same notebook
import os
from skimage import io
import numpy as np
import matplotlib.pyplot as plt
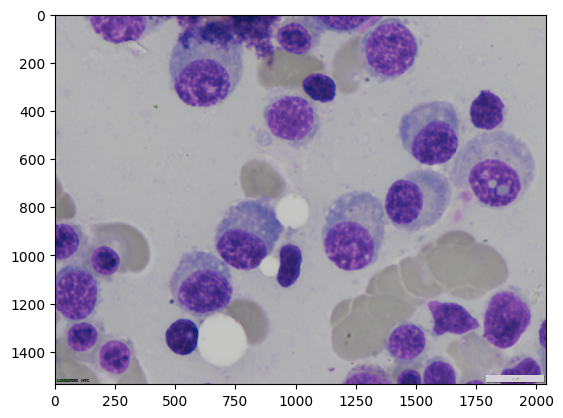
Load test images#
Load the same test images we deid in previous notebooks
image_path = r"..\..\data\SOTA_segmentation\cell_00068.bmp"
label_path = r"..\..\data\SOTA_segmentation\cell_00068_label.tiff"

image_name = os.path.basename(image_path)
image_name = os.path.splitext(image_name)[0]
print(image_name)

img = io.imread(image_path)

if (len(img.shape) == 2):
    img = np.expand_dims(img, axis=2)  # Add channel dimension if it's grayscale
    # repeat channels so there is 3
    img = np.repeat(img, 3, axis=2)

# if you have smaller GPU try cropping image with ROI (switch comment (#) on below lines)
#roi = np.s_[100:1100, 100:1100, ...]
roi = np.s_[:]
img = img[roi]

# Print image information
print(f"Loaded image shape: {img.shape}, dtype: {img.dtype}")

plt.imshow(img)
cell_00068
Loaded image shape: (1536, 2040, 3), dtype: uint8
<matplotlib.image.AxesImage at 0x1c5494f09d0>
Import Segmenters and execute_appose from napari_ai_lab#
What are Segmenters? Segmenters are classes that wrap deep learning models with useful logic:
Check if dependencies are available locally (see here)
If not available locally, provide execution strings suitable for Appose (see here)
What is execute_appose? A utility function (see here) that takes a segmenter and wraps all the Appose logic needed to create environments and call execution strings.
Note: This is very early experimental work. Myself and other people will be iterating on such code and better designs will be coming in the future!
from napari_ai_lab.Segmenters.GlobalSegmenters.CellposeSegmenter import CellposeSegmenter
from napari_ai_lab.Segmenters.execute_appose import execute_appose
Check If Cellpose is Available Locally#
Let’s see if Cellpose is available in our current environment. Spoiler: it probably isn’t, which is perfect for demonstrating Appose!
# Simple cellpose configuration
segmenter = CellposeSegmenter(model_type="cyto2", diameter=100)

run_in_local_environment = segmenter.are_dependencies_available()

print(f"🔍 Cellpose local: {'✅ Available' if run_in_local_environment else '❌ Not found'}")
🔍 Cellpose local: ❌ Not found
Run Cellpose 3 in Different Environment#
Now let’s call Cellpose 3 using execute_appose! We point to the microsam_cellpose3 environment.
cellpose_env_path = r"..\..\pixi\microsam_cellpose3\.pixi\envs\default"

result = execute_appose(img, segmenter, cellpose_env_path)

cellpose3_result = result.ndarray().copy()
Cellpose not available locally - generated execution string for remote processing
This string can be sent to a cellpose-enabled environment for execution
dict_keys(['mask'])
dict_keys(['mask'])
Run CellposeSAM in Different Environment#
Now let’s run cellpose in the microsam_cellposesam environment. This one has the newer (version 4) cellpose, that uses SAM, so the reult will be different.
cellpose_env_path = r"..\..\pixi\microsam_cellposesam\.pixi\envs\default"
#cellpose_env_path = r"C:\\Users\\bnort\\miniconda3\\envs\\microsam_cellpose"

result = execute_appose(img, segmenter, cellpose_env_path)

cellposesam_result= result.ndarray().copy()
Cellpose not available locally - generated execution string for remote processing
This string can be sent to a cellpose-enabled environment for execution
dict_keys(['mask'])
dict_keys(['mask'])
Check Result Types#
Quick check to make sure we got numpy arrays back from both runs.
type(cellpose3_result), type(cellposesam_result)
(numpy.ndarray, numpy.ndarray)
Prepare for Visualization#
Load ground truth and import the visualization helper to create overlays.
# Load ground truth for comparison
ground_truth = io.imread(label_path)
# Import visualization helper
from tnia.plotting.plt_helper import mask_overlay
Create Ground Truth and Cellpose 3 Overlays#
Create overlays for ground truth and Cellpose 3 results.
type(img), type(ground_truth)
ground_truth_overlay = mask_overlay(img, ground_truth)
cellpose3_overlay = mask_overlay(img, cellpose3_result)
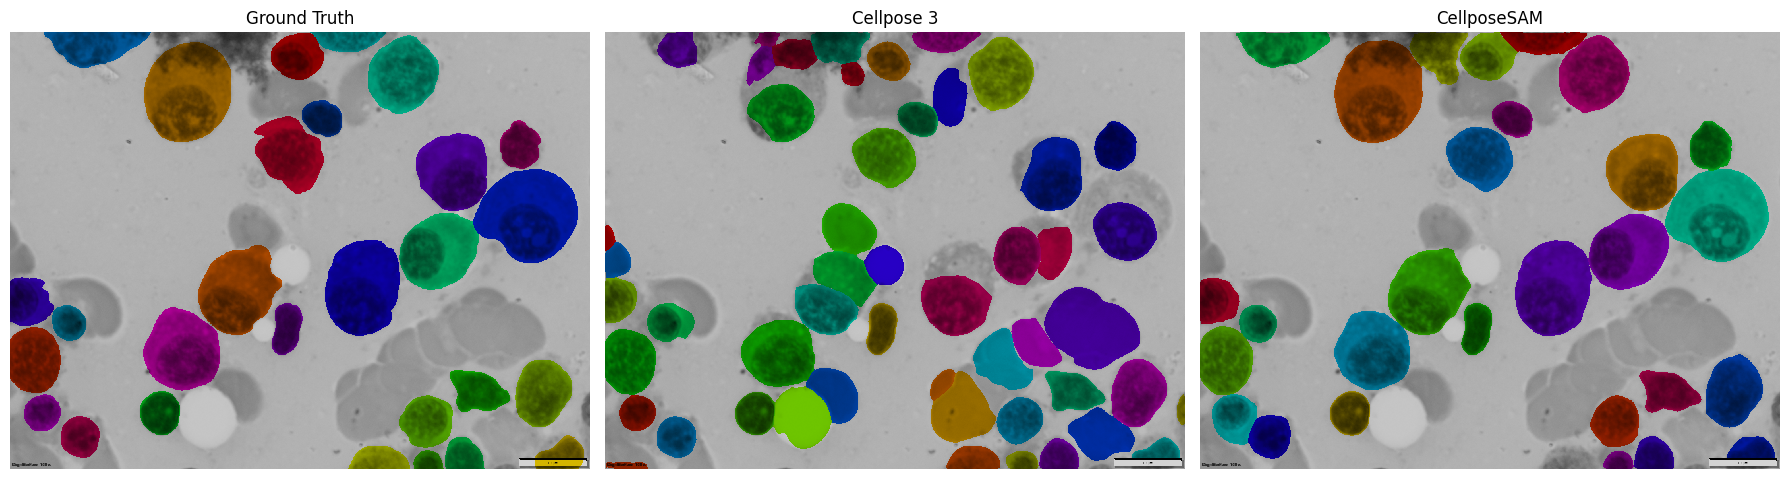
Compare All Results#
Finally, let’s see how both Cellpose versions performed compared to the ground truth in a nice 3-panel comparison!
# Create overlays
cellposesam_overlay = mask_overlay(img, cellposesam_result)

# Create 3-panel comparison plot
fig, axes = plt.subplots(1, 3, figsize=(18, 6))

axes[0].imshow(ground_truth_overlay)
axes[0].set_title('Ground Truth')
axes[0].axis('off')

axes[1].imshow(cellpose3_overlay)
axes[1].set_title('Cellpose 3')
axes[1].axis('off')

axes[2].imshow(cellposesam_overlay)
axes[2].set_title('CellposeSAM')
axes[2].axis('off')

plt.tight_layout()
plt.show()