Pixi#
What is Pixi?#
Pixi is a replacement for conda. If you use conda environments, pixi does the same job but faster and more reliable. It creates reproducible environments from a single pixi.toml file, eliminating “works on my machine” problems that plague conda workflows.
The Two Key Files: pixi.toml and pixi.lock#
pixi.toml - Your Project Recipe
This is the human-readable file you create and edit. It defines:
What packages you need (e.g.,
pytorch,numpy)Version constraints (e.g.,
>=1.0,==2.1.*)Tasks and scripts for your project
Which channels to use for packages
Think of it like a shopping list - you specify what you want, but not necessarily the exact brands or versions.
pixi.lock - The Exact Recipe
This file is automatically generated by Pixi and contains:
Exact versions of every package installed (including dependencies)
Cryptographic hashes to verify package integrity
Complete dependency tree with all transitive dependencies
Think of it like a detailed receipt - it records exactly what was installed, down to the specific version and source.
Why This Makes Environments Reproducible#
pixi.tomlis flexible - You say “I need PyTorch” without specifying every detailpixi.lockis precise - Pixi figures out exactly which versions work togetherAnyone can recreate the exact same environment by running
pixi installwith both filesNo more “dependency hell” - The lock file ensures the same versions work everywhere
Future-proof - Even years later,
pixi installwill recreate the identical environment
This is why Pixi environments are truly reproducible - the combination of human-readable requirements (pixi.toml) plus machine-precise specifications (pixi.lock) guarantees identical results across different computers and time periods.
How Pixi Uses Both Files Automatically#
You don’t need to do anything special! Pixi is smart enough to use both files automatically:
When
pixi.lockexists: Pixi uses the exact versions from the lock file (guaranteed reproducibility)When
pixi.lockis missing: Pixi readspixi.toml, resolves dependencies, and creates a newpixi.lockWhen you run
pixi install: Pixi always checks the lock file first for the exact environment
The workflow is automatic:
You edit
pixi.toml(add/remove packages)Run
pixi installorpixi add <package>Pixi automatically updates
pixi.lockwith the resolved versionsEveryone else runs
pixi installand gets the identical environment from the lock file
Key point: Always commit both pixi.toml AND pixi.lock to version control (git) so others get exactly the same environment you have.
Updating to New Versions#
You usually don’t need to delete the lock file! Pixi has smart commands for updates:
To update all packages to newer versions:
pixi update
To update a specific package:
pixi update <package-name>
To add a new package (automatically updates lock):
pixi add <package-name>
When you might delete pixi.lock:
Major dependency conflicts - When updates fail due to complex conflicts
Starting fresh - When you want to completely re-resolve all dependencies
Broken environment - When something went wrong and you want a clean slate
After deleting pixi.lock:
rm pixi.lock        # Delete the lock file
pixi install        # Pixi creates a new lock with latest compatible versions
Pro tip: Try pixi update first - deleting the lock file is usually unnecessary and pixi update is safer!
Creating Environments#
Important: Run these commands in a folder containing pixi.toml (e.g., pixi/appose_napari_ai/, pixi/microsam_cellpose3/, or pixi/stardist/).
Create environment only:
pixi install
Create environment AND run a task:
pixi run startup
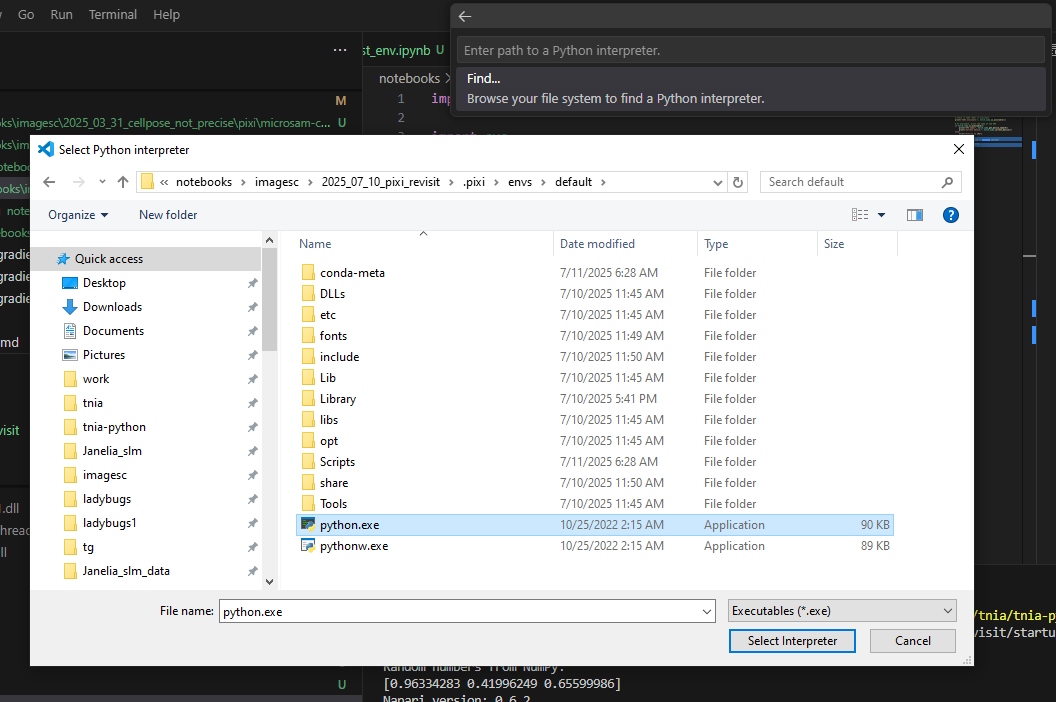
Load environment in VSCode#
To run a script with a pixi created environment
[ctrl][shift][p] to open command pallette
‘Python: Select Interpreter’
‘Enter Interpreter Path’
‘Browse your file system’
Then (see below screenshot) select Python interpreter
Make Pixi Environment Available to VS Code Notebooks#
Register as Jupyter Kernel#
This makes your environment appear in the kernel selector dropdown:
For example to make the appose_napari_ai environment available you would run the below command in the pixi/appose_napari_ai/ folder. For different environments you would change folder and environment display names.
pixi run python -m ipykernel install --user --name=appose_napari_ai --display-name "Pixi (appose_napari_ai)"
Note If this fails with “No module named ipykernel”:
First add ipykernel to your project:
pixi add ipykernelThen run the command above
Troubleshooting#
“No module ipykernel”: Add it with
pixi add ipykernelfirstCan’t find environment: Use
pixi infoto see environment pathKernel not showing up: Restart VS Code after registering kernel
Using Pixi Shell for Proper Environment Setup#
For environments that need special DLLs (like CUDNN), use pixi shell to ensure all paths are set correctly:
Navigate to your environment folder (e.g.,
pixi/microsam_cellposesam/)Run
pixi shellto activate the environment with all pathsStart VS Code from within the shell:
code .
This ensures VS Code inherits the complete environment setup, including DLL paths that might be missing otherwise.